ZeroGravity: DA node setup guide
WARNING !!!
DA Node on v3 Galileo is not available to run at the moment. Stay tuned to 0G Discord.
| network | chain_id | DA Entrance Contract | DA node version | DA node commit |
|---|---|---|---|---|
| testnet | zgtendermint_16600-2 | 0x857C0A28A8634614BB2C96039Cf4a20AFF709Aa9 | v1.1.2 | aa8eb2120d3977000aa68da38776fc375c5f18a4 |
Official ZeroGravity installation docs could be found here
This guide describes the installation method, slightly different from the official one. This creates a copy of the executable file and creates a separate directory for the configuration. The project repository and the running node are independent of each other. You can test builds of new versions without fear of breaking the working one.
Hardware Requirements
- Memory: 16 GB
- CPU: 8 cores
- Disk: 1 TB NVME SSD
- Bandwidth: 100 MBps for Download / Upload
We use OS Ubuntu, version 22.04 and higher
Environment preparation
Package installation
sudo apt-get update
sudo apt-get install make gcc build-essential protobuf-compiler clang cmake jq -y
Rust installation
Installation script for current user, official page.
curl --proto '=https' --tlsv1.2 -sSf https://sh.rustup.rs | sh
Add Rust enviroments to .bash_profile
echo . '$HOME'/.cargo/env >> $HOME/.bash_profile
source $HOME/.bash_profile
Build binary from sources
Create directory for used binary add it to PATH
mkdir $HOME/bin
echo export PATH='$PATH':$HOME/bin >> $HOME/.bash_profile
source $HOME/.bash_profile
Clone OG repo and build
cd ~
git clone https://github.com/0glabs/0g-da-node.git
cd 0g-da-node
git fetch --all --tags
git checkout tags/v1.1.2 -b v1.1.2
cargo build --release
Run the script that loads the parameters:
./dev_support/download_params.sh
Copy binary to ~/bin, we rename this one from server to da-server:
cp $HOME/0g-da-node/target/release/server $HOME/bin/da-server
Node configuration
Create working directory for DA node, copy params, copy configuration file:
mkdir $HOME/.zg_da
cp -r $HOME/0g-da-node/params $HOME/.zg_da
cp $HOME/0g-da-node/config_example.toml $HOME/.zg_da/config.toml
Generate signer BLS private key ( signer_bls_private_key ):
cargo run --bin key-gen
Save the returned value, you will need it when creating a configuration file
Generate new signer eth key ( signer_eth_private_key )
This should be done on a consensus node. Its installation is described here
KEY_NAME=da_node_key
0gchaind keys add $KEY_NAME --eth
Enter keyring password (and keep it secure)
The public key address (bech32 format) and mnemonics will be returned. The mnemonics must be kept secure!
To see the key address in EVM format. This public key was used for EVM transactions, chain faucet take this address format
echo "0x$(0gchaind debug addr $(0gchaind keys show $KEY_NAME -a) | grep hex | awk '{print $3}')"
For export private key ( signer_eth_private_key ), use command:
0gchaind keys unsafe-export-eth-key $KEY_NAME
Edit config file
You need to make some changes to $HOME/.zg_da/config.toml file:
nano $HOME/.zg_da/config.toml
grpc_listen_address = "0.0.0.0:34000" - if you want to change node gRPC port, it's optional
eth_rpc_endpoint = "https://rpc-testnet.0g.ai" - recommended to change default endpoint to your validator/consensys node EVM-RPC
socket_address = "<public_ip/dns>:34000" = public grpc service socket address to register in DA contract. ip:34000 (keep same port as the grpc listen address) or if you have dns, fill your dns
da_entrance_address = "" - check DA entrance contract address, all actual contracts information in docs https://docs.0g.ai/0g-doc/docs/contract-addresses.
signer_bls_private_key = "" - signer BLS private key, insert your value, generated at the previous step
signer_eth_private_key = "" - signer eth account private key, insert your value, generated at the previous step
Firewall settings
Open gRPC port if you need access from the outside:
sudo ufw allow 34000
Run node
You can run node (for test purpose) in terminal with command:
cd $HOME/.zg_da
da-server --config $HOME/.zg_da/config.toml
Run node as service
Create service file:
tee $HOME/zgda.service > /dev/null <<EOF
[Unit]
Description=0G-DA Node
After=network.target

[Service]
User=$USER
WorkingDirectory=$HOME/.zg_da
ExecStart=$HOME/bin/da-server --config $HOME/.zg_da/config.toml
Restart=always
RestartSec=10
LimitNOFILE=65535

[Install]
WantedBy=multi-user.target
EOF
Init daemon with simlink:
sudo ln -s $HOME/zgda.service /etc/systemd/system
sudo systemctl daemon-reload
sudo systemctl enable zgda
Run node and check logs:
sudo systemctl start zgda
journalctl -u zgda -o cat -f
Checking
The first time node will try to register in DA smart contract.
For this to be successful, two conditions must be met:
The node address must have tokens to execute the transaction
The node address must have delegation to any active validator (current minimum delegation value is 10 A0G)
Token faucet: https://faucet.0g.ai
KEY_NAME=da_node_key
VALIDATOR_ADDR=0gvaloper1zk8ut8e6yw040g2xxc5e9855u88wv0td604gwd # you can select any validator from the active set
COS_NODE_URL=<your-consensus-node-url>
COS_PORT_RPC=<your-consensus-node-tendermint_port> # by default: 26657

0gchaind tx staking delegate \
    ${VALIDATOR_ADDR} \
    10000000ua0g \
    --from ${KEY_NAME} \
    --node "tcp://${COS_NODE_URL}:${COS_PORT_RPC}"
Restart node:
sudo systemctl restart zgda
Explorer for checking reg transaction: https://chainscan-newton.0g.ai/address/
Check node logs
journalctl -u zgda -o cat -f
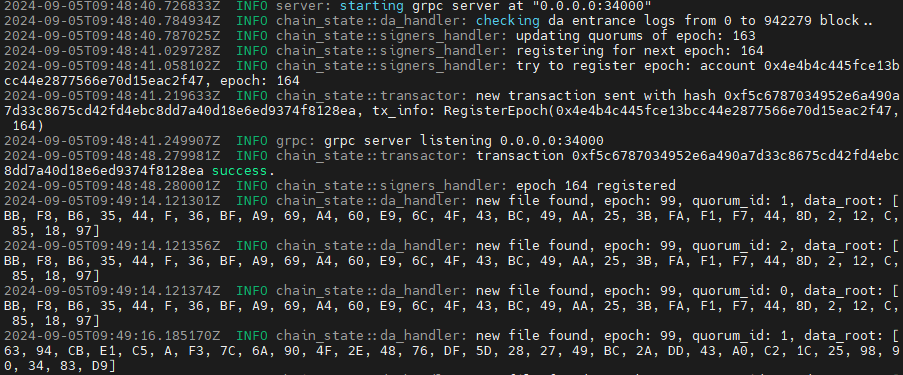
Expected logs on initial startup, like:

Expected logs during normal operation, like:

Check node daemon status:
sudo systemctl status zgda
Best regards and Good luck with your installation!❤️👍
Pro-Nodes75 team📡🗻